To download file from Google Drive from command line

wget --load-cookies /tmp/cookies.txt "https://docs.google.com/uc?export=download&confirm=$(wget --quiet --save-cookies /tmp/cookies.txt --keep-session-cookies --no-check-certificate 'https://docs.google.com/uc?export=download&id=file_id_here' -O- | sed -rn 's/.*confirm=([0-9A-Za-z_]+).*/\1\n/p')&id=file_id_here" -O filename_in_google_drive_here && rm -rf /tmp/cookies.txt


Remove Linux package via RPM without removing dependencies

Yesterday, i’ve tried removing net-tools from my CentOS 5 installation. Luckily i didn’t press Yes like i always do. It seems that removal of net-tools will also remove a whole lot of other things seemingly unrelated to it.

Since i’m not really a RTFM guy, i’m more of a RTSO (Stack Overflow) guy, this is the gist of what i’m trying to do. For this example, let say you are trying to remove httpd (Apache)Before removing anything, search for the package first using :

rpm -qa | grep "httpd"

Change httpd to whatever package you’re trying to remove.

You will see a list of packages found  :

httpd-2.4.6-80.el7.centos.x86_64
httpd-devel-2.4.6-80.el7.centos.x86_64
httpd-tools-2.4.6-80.el7.centos.x86_64

To remove a package, just type:

rpm -e httpd-devel-2.4.6-80.el7.centos.x86_64

This will remove httpd-devel. If you just want to remove httpd-devel without removing its dependencies, add –nodeps as such:

rpm -e httpd-devel-2.4.6-80.el7.centos.x86_64 --nodeps

By adding –nodeps flagthis will tell rpm to remove only httpd-devel and ignore its dependencies.

If, you are encountering “Specifies Multiple Packages” error, use this:

rpm -e httpd-devel-2.4.6-80.el7.centos.x86_64 --nodeps --allmatches

This will actually remove all packages using the same name. This multiple packages however can be earlier detected when you are using rpm -qa before doing rpm -e. 

That’s all for now. Adios.

Upgrading PHP 5.3 to PHP 5.6 in CentOS 5.4

Due to some hardware restriction and limitations, i was forced recently to upgrade PHP from its previous version (5.3) to a slightly newer version (5.6). Below are the steps on how to do it with the least pain in the arse. At least in CentOS.

1. Upgrade to CentOS 5.11

Create a new repository file as below. If you don’t have it, just open a new file and create the content as such. Modify as necessary.

[base]
name=CentOS-$releasever - Base
baseurl=http://vault.centos.org/5.11/os/$basearch/
enabled=1
gpgcheck=1
gpgkey=file:///etc/pki/rpm-gpg/RPM-GPG-KEY-CentOS-5

After adding/modifying the new repo file and set it to enabled, proceed to update to the latest version of CentOS 5 which is CentOS 5.11. It is not advisable or maybe impossible to upgrade to CentOS 6 from CentOS 5 without breaking or nuking the system.

yum update

Yeah, do your yummy thing, yum.

2. PHP 5.6 Installation

To install PHP 5.6, add these extra repositories:

rpm -Uvh http://archives.fedoraproject.org/pub/archive/epel/5/x86_64/epel-release-5-4.noarch.rpm
rpm -Uvh http://rpms.famillecollet.com/enterprise/remi-release-5.rpm

Before upgrading, do remove all traces of previous version of PHP:

yum remove php*
yum clean all

Now we can start installing PHP 5.6 by enabling REMI repo and disabling CentOS-Base repository.

CentOS-Base.repo

[base]
name=CentOS-$releasever - Base
baseurl=http://vault.centos.org/5.11/os/$basearch/
enabled=0
gpgcheck=1
gpgkey=file:///etc/pki/rpm-gpg/RPM-GPG-KEY-CentOS-5

remi.repo

[remi]
name=Les RPM de remi pour Enterprise Linux 5 - $basearch
#baseurl=http://rpms.famillecollet.com/enterprise/5/remi/$basearch/
mirrorlist=http://rpms.famillecollet.com/enterprise/5/remi/mirror
enabled=1
gpgcheck=1
gpgkey=file:///etc/pki/rpm-gpg/RPM-GPG-KEY-remi
[remi-php56]
name=Les RPM de remi de PHP 5.6 pour Enterprise Linux 5 - $basearch
#baseurl=http://rpms.famillecollet.com/enterprise/5/php56/$basearch/
mirrorlist=http://rpms.famillecollet.com/enterprise/5/php56/mirror
# WARNING: If you enable this repository, you must also enable "remi"
enabled=1
gpgcheck=1
gpgkey=file:///etc/pki/rpm-gpg/RPM-GPG-KEY-remi

After enabling the REMI repositories, we can start twith the installation of PHP 5.6 with modules selection of your choice:

yum install php-pear
yum install php-pecl-json
yum install php-fpm php-common
yum install php-opcache php-pecl-apcu php-cli php-pear php-pdo php-mysqlnd php-pgsql php-pecl-mongo php-pecl-sqlite php-pecl-memcache php-pecl-memcached php-gd php-mbstring php-mcrypt php-xml
yum install php

Somehow, i’m getting weird error if i’m installing PHP via yum first. Therefore i’m yumming php last. Once done. restart the Apache service:

service httpd restart

Just a sanity check, add this to make sure Apache starts on boot:

chkconfig httpd on

That should do it. PHP is now upgraded to version 5.6 🙂

3. Optional – OCI8 extension installation

To enable the OCI8 extension for Oracle, the Oracle InstantClient package is needed. Download the Oracle InstantClient from Oracle website, you may need to create an Oracle account. You will need to download the basic and devel package. Once downloaded, use rpm to install as such:

rpm -Uvh oracle-instantclient11.2-basic-11.2.0.3.0-1.x86_64.rpm
rpm -Uvh oracle-instantclient11.2-devel-11.2.0.3.0-1.x86_64.rpm

Take note of installation path of the InstantClient library files. In my case, its :

/usr/lib/oracle/11.2/client64/lib

If you are unable to find the InstantClient installation path, just use :

sudo updatedb
locate oracle | grep "client64/lib"

This will list all matching folders.

We can now proceed with the installation of OCI8 using PECL. PECL is installed together with PEAR. If you don’t have PEAR, there are good chance you don’t have PECL as well. Please install PEAR and PECL first if it’s not installed.

OCI8 extensions for PHP are grouped into 3 categories:

  • oci8 for PHP 7
  • oci8-2.0.12 for PHP 5.2 – PHP 5.6
  • oci8-1.4.10 for PHP 4.3.9 – PHP 5.1

Therefore, for PHP 5.6, i have to define the version as shown below. If it is not defined, the latest version will be installed and it will throw an error.

pecl install oci8-2.0.12

During the building process, you will be prompted for ORACLE_HOME location, just type the location in this format (<instantclient (do not change)>, <location of InstantClient library>:

instantclient, /usr/lib/oracle/11.2/client64/lib

If everything goes right, the OCI8 extension will be compiled and installed in your PHP extension directory (extension_dir) automatically. But you do need to to add this line in php.ini manually:

extension=oci8.so

Save the php.ini file, restart the Apache service and enjoy.

service httpd restart

Job well done. Adios.

Converting Comma Separated Data (CSV) data to rows in MySQL

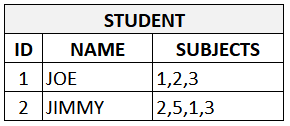
It took me quite some time to actually find the solution for joining comma separated values column with a reference table. For this example, let say we have these 2 tables as show below. REF_SUBJECTS is the reference table for the list of subjects available for student to enroll with. STUDENT is the list of student with its enrolled subjects stored in one column in CSV format.

XCaptureYCapture

Therefore, we need to find a way to join REF_SUBJECTS.ID with STUDENT.SUBJECTS.

This can actually be achieved using this genius solution as shared in this SO thread :
https://stackoverflow.com/questions/19073500/sql-split-comma-separated-row

This is the original syntax of the SQL:

SELECT
   SUBSTRING_INDEX(SUBSTRING_INDEX(t.values, ',', n.n), ',', -1) value
FROM
   table1 t
   CROSS JOIN tally n
WHERE
   n.n <= 1 + (LENGTH(t.values) - LENGTH(REPLACE(t.values, ',', ''))) 
ORDER BY 
   value

Therefore, to use this for our example, we need to change it like so to get a list of subjects taken by our student, Jimmy :

SELECT 
   SUBSTRING_INDEX(SUBSTRING_INDEX(t.subjects, ',', n.id), ',', -1) as subjects_list
FROM
   mydb.student t
   CROSS JOIN mydb.ref_subjects n
WHERE
   n.id <= 1 + (LENGTH(t.subjects) - LENGTH(REPLACE(t.subjects, ',', ''))) 
   and t.id= 2

This will return 4 rows of data, which contains the subject ID of subjects taken by Jimmy.

I’m so happy this actually worked. My hats off to you.

Importing large SQL file with SQL Server

Recently i came across a situation where i was not allowed to access the SQL Server database directly. This is quite troublesome since i have to move 3 big databases from the original server to another server in a different network segment, disconnected from each other.

Therefore, i cannot do the usual attach/detach, and maybe doing the backup/restore. Thus, i was left with using the SQL Server Management Studio (SSMS).

After exporting the database using the Generate Scripts menu, i was presented with a very big SQL file and i was unable to open it with SSMS because of its size. So i had to use this tool called sqlcmd which comes preinstalled with SQL Server. sqlcmd is a command line tool to run scripts file, TSQL statements, and system procedures.

The basic syntax for sqlcmd is :

sqlcmd -S servername -U username -P password -d database_name -V 17 -i filename.sql

This is a sample usage :

sqlcmd -S "Beast" -U "sa" -P "sa123" -d testDB -V 17 -i testdb.sql

-V stands for error_severity_level, which i’m still unable to understand what it’s supposed to do. Tinkered with it for a while, but nothing happened.

Oh well, I guess the more you know, the more you don’t know.


Enabling SAMBA attributes in OpenLDAP in CentOS / Redhat

yum install samba samba-common

locate samba.ldif

cp /usr/share/doc/samba-4.6.2/LDAP/samba.ldif /etc/openldap/slapd.d/cn=config/cn=schema

cd /etc/openldap/slapd.d/cn=config/cn=schema/

mv samba.ldif cn={4}samba.ldif

vi cn={4}samba.ldif
edit to this:
dn: cn={4}samba.ldif
objectClass: olcSchemaConfig
cn: cn={4}samba.ldif

service slapd restart

Now the samba attributes is now available in LDAP

Converting .htaccess rewrite rules to IIS

  1. Make sure the URL Rewrite module is installed and enabled for IIS. Right click on Sites, and make sure there is an icon with URL Rewrite label is listed in the IIS section.
  2. Install URL Rewrite module from IIS website if the module is not available.
    Download the module here : https://www.iis.net/downloads/microsoft/url-rewrite.
  3. After installing, close and reopen the IIS Manager. Refreshing the modules list will not work.
  4. Double click on the URL Rewrite module, and go to inbound rules > Import Rules.
  5. Copy and paste the rewrite rule from .htaccess to the Rewrite rules box. You will then get the converted rules in Tree View and XML view.
  6. Click on Apply to accept the converted rules and click on Back to Rules.

Thats it! 🙂


My personal notepad, scratchpad, and walkthrough as a full stack open source developer. Malaysia mari.